
Kubernetes for Beginners
Kubernetes (often abbreviated as K8s) is an open-source container orchestration platform. It automates the deployment, scaling, and management of containerised applications. Google originally developed the project and open-sourced it in 2014. The Cloud Native Computing Foundation (CNCF) now maintains it
Kubernetes has quickly become one of the most popular container orchestration platforms. It’s used by organisations of all sizes to manage and deploy their applications. People attribute the platform’s popularity to its ability to abstract the underlying infrastructure and offer a consistent and reliable platform for running containerised applications.
As a result, Kubernetes allows developers to focus on writing code and building applications, rather than worrying about the underlying infrastructure.
Already set up with Kuberenetes check out Containerising Workloads for your Business for some next steps.
Key Concepts in Kubernetes
Containerisation: Containers are lightweight, portable, and self-contained environments that can run applications and their dependencies. Kubernetes is built on top of container technology and uses containers to deploy and manage applications.
Orchestration: Kubernetes is an orchestration tool, which means it helps automate the deployment, scaling, and management of containerised applications. You can declaratively define how your application should be deployed using it. Additionally, it handles the details of scheduling containers, monitoring their health, and managing their lifecycle.
Nodes and Clusters: A node is a physical or virtual machine that runs Kubernetes and hosts containers. A cluster is a set of nodes that work together to run your application. Kubernetes can manage a large number of nodes across multiple data centers or cloud providers.
Pods: Pods are the smallest deployable units in Kubernetes. A pod is a logical host for one or more containers; furthermore, it provides them with a shared network namespace and storage Containers in a pod can communicate with each other using localhost, and they can share files and volumes.
Services: Services are a way to expose a set of pods to the network. A service provides a stable IP address and DNS name for a set of pods, and it can load balance traffic across them. Services can also provide a layer of abstraction between the application and the network. This allows you to change the IP addresses or ports of the pods without affecting the application.
These are just a few of the key concepts in Kubernetes, but they should give you a good foundation for understanding how it works.
Getting Started with Kubernetes
Setting up a Kubernetes cluster can be a complex task. It can be simplified by using cloud providers such as;
- Amazon Web Services (AWS)
- Google Cloud Platform (GCP)
- Microsoft Azure.
You can easily set up managed Kubernetes services offered by these providers with just a few clicks.
Once the cluster is set up, the next step is to interact with it. There are several ways to interact with a Kubernetes cluster, including;
- Using the Kubernetes command-line tool (kubectl)
- Web UIs such as the Kubernetes Dashboard
- Using APIs to automate interactions.
To use kubectl, you first need to install it on your local machine. This tool allows you to interact with the cluster and deploy applications. To connect to the cluster, you need to provide kubectl with the necessary credentials, such as the cluster’s endpoint and authentication details.
Once you’re connected, you can create and manage Kubernetes resources such as deployments, services, and pods. You can define these resources in YAML configuration files, which you can easily version and manage using tools like Git.
The Kubernetes Dashboard is another popular way to interact with the cluster. It provides a web-based UI that allows you to view and manage cluster resources, as well as monitor their health and performance.
Kubernetes Architecture
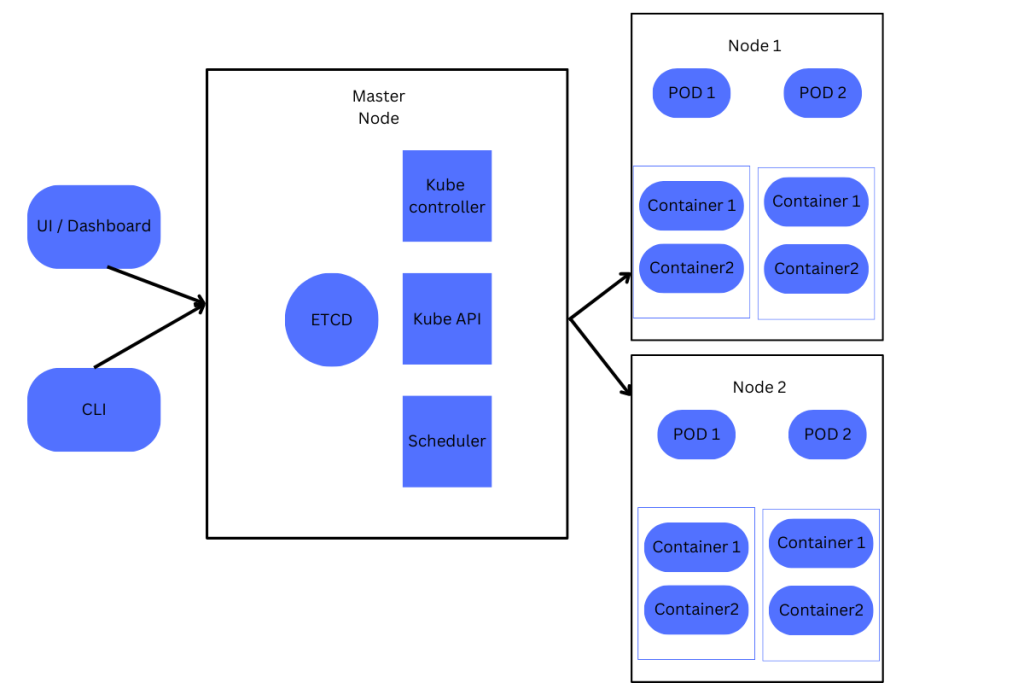
Kubernetes consists of a Master Node and one or more Worker Nodes. The Master Node acts as the control plane for the entire cluster and is responsible for managing the overall state of the system. It runs several components, including the Kubernetes API Server, etcd, Kubernetes Controller Manager, and Kubernetes Scheduler.
The Kubernetes API Server is the central component that exposes the Kubernetes API. It’s used to manage the state of the system and receives requests from various components and other tools, such as kubectl, and translates them into actions that are sent to etcd.
Etcd is a distributed key-value store that stores the configuration and state information for the entire Kubernetes cluster. The cluster uses it as the primary data store, and it writes all changes to the state of the system to etcd.
The Kubernetes Controller Manager is responsible for managing the various controllers that are part of the system. These controllers watch the state of the system and take actions to ensure that the desired state is maintained.
The Kubernetes Scheduler is responsible for scheduling pods onto nodes in the cluster. The scheduler takes into account various factors, such as resource requirements and node availability, to ensure that it schedules pods onto appropriate nodes.
The Worker Nodes are the nodes in the Kubernetes cluster that run the containerised applications. They are responsible for executing the tasks assigned to them by the Master Node, such as running pods and exposing services.
Deploying Applications in Kubernetes
Creating Deployments
To create a deployment, you first need to define the desired state of your application in a YAML file. This YAML file contains information about the container image, the number of replicas you want to run, and other configuration settings. Once you have the YAML file, you can create the deployment using the kubectl create command.
Creating Services
You can use services to expose your application to the network. To create a service, you also need to define a YAML file that specifies the desired configuration. You can create the service using the kubectl create command.
Scaling Deployments
To scale a deployment, you can use the kubectl scale command. This command allows you to increase or decrease the number of replicas running for a particular deployment.
Updating Deployments:
To update a deployment, you first need to make changes to the YAML file that defines the deployment. Once you have made the necessary changes, you can use the kubectl apply command to update the deployment. This will create a new replica set with the updated configuration, and gradually replace the old replicas with the new ones.
That’s a basic overview of how to deploy applications in Kubernetes. Of course, you can use many more advanced features and configurations, but these basic concepts should suffice to get started.
Benefits of Kubernetes
- Scalability: It can easily handle large-scale deployments and can scale up or down to meet the demands of the application.
- High Availability: It has built-in features for ensuring high availability of the application, including automatic failover and replication.
- Automation: It automates many tasks related to deploying and managing containers, including load balancing, scaling, and self-healing.
- Portability: It provides a consistent platform for deploying and managing applications across different environments, such as on-premise data centers or public clouds.
Conclusion
Kuberenetes is a big beast to tackle but once you get started you can really see the advantages of implementing it into your business and how leveraging this technology and take your availability and scalability to the next level.